The Comprehensive Guide to Growing and Caring for Viola Plants
Welcome to our comprehensive guide on growing and caring for the delightful viola plant. Whether you're a seasoned gardener or a green-fingered novice, this guide will provide you with all the knowledge you need to cultivate these charming flowers successfully. Violas, with their fascinating markings and vibrant colours, are a joy to behold.
They're not just a feast for the eyes, but also edible, making them a versatile addition to any garden. From the cool climates of North America and Europe, these hardy plants have adapted to bloom in a variety of conditions, making them a favourite amongst gardeners worldwide. In this guide, we'll delve into the basics of viola plants, explore different types, and provide step-by-step instructions on how to grow violas from seed.
We'll also share expert tips on caring for your violas, dealing with common diseases, and even growing violas indoors. So, whether you're planting violas in pots, hanging baskets, or directly in your garden soil, we've got you covered. Let's embark on this gardening journey together.
Understanding Viola Plants

Dive into the world of Viola plants, a genus that boasts over 680 species, each with its own unique charm. From the temperate Northern Hemisphere to the diverse landscapes of Hawaii, Australasia, and the Andes, Violas have made their mark. These versatile plants, known for their ornamental flowers, can be annuals, perennials, or even small shrubs.
In this section, we'll delve into understanding Viola plants, exploring their basic characteristics and the different types that exist. Whether you're a seasoned gardener or a novice, this guide will equip you with the knowledge to grow and care for these beautiful plants.
The Basics of Viola Plants
The viola flower is an extraordinary specimen within the kingdom of plants. It hails from the Violaceae family, where it holds position as the largest genus, boasting over 680 species. The infrequent characteristics of this genus have allowed its species to plant their roots (literally) in various regions around the globe; from the temperate Northern Hemisphere to diverse landscapes like Hawaii, Australasia, and even the Andes.
Among these species, you will find a diverse array of annual plants, perennials, and some shrubs. While viola flowers are known for their aesthetic appeal in gardens, they are not choosy when it comes to growing space. You can easily start a viola plant from seed, and if you take care to protect fresh transplants from frost, they flourish in both warm and cold climates.
A fascinating feature of viola flowers is their penchant for darkness during germination. Keep them indoors, in a warm, dark location, and carefully thin the seeds once they sprout. This method of cultivation combined with their attractive range and appearance make violas a popular choice in ornamental horticulture.
Overall, connecting with a viola plant means embracing an incredible diversity of flowers, from viola tricolor to viola x and more, each contributing to the beautiful canvas that is our world of flora. It is this variety within unity that truly underlines the basics of viola plants.
Different Types of Violas
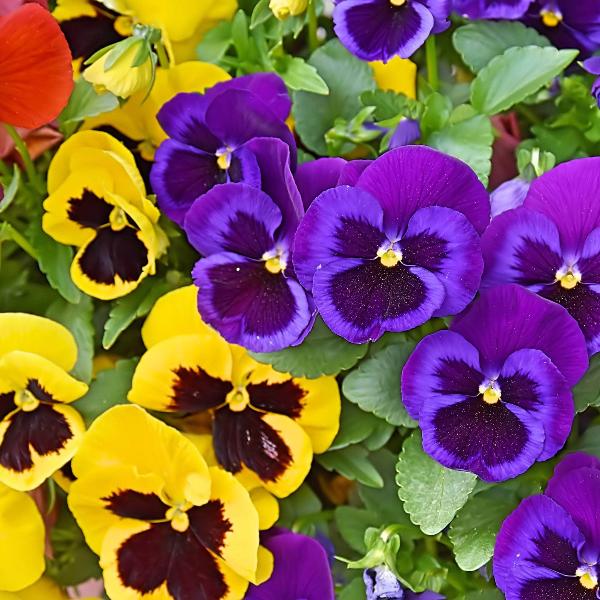
Viola x wittrockiana, more commonly known as the garden pansy, is a short-lived perennial, popularly grown in colder climates for its large flowers.
Viola tricolor, popularly known as Johnny-jump-up, is a progenitor to the pansy and sprouts prominently in gardens as an edging plant.
Viola sororia, known as the wild blue violet, is a native species that often invades cultivated gardens, primarily thriving in woodland areas.
The tufted or horned violet, Viola cornuta, is a perennial species known for its smaller flowers.
Other violas of note include the Viola cazorlensis, Viola delphinantha, and Viola kosaninii found in the Erpetion section, and the Viola banksii and Viola hederacea, both commonly known as the Australian native violet, within the Leptidium section.
These are just a few examples; the viola family is as wide as it is beautiful, with over 680 species contributing to its diversity.
How to Grow Violas

Growing violas can be a rewarding experience, especially when you see the vibrant blooms brightening up your garden. This section will guide you through the process of growing violas, from choosing the right time and place to plant, to nurturing the seeds into healthy, blooming plants.
Whether you're a seasoned gardener or a beginner, growing violas is a straightforward process. With the right care and attention, you can enjoy these beautiful flowers throughout the grow season. Let's delve into the details of how to grow violas successfully.
Choosing the Right Time and Place to Plant Violas
Choosing the ideal time and location to plant violas is fundamental to their successful growth. While in cooler climates, violas are typically showcased as the first seedlings in nurseries during spring; warmer climates tend to present them towards the end of summer.
A careful choice of space for your viola plant plays a crucial role too. Hilly violas demand a spacing of about 6-8 inches, giving them enough room to grow. On the other hand, spreading or trailing varieties flourish at 10-12 inches apart, as it allows them to spread out more.
Violas are highly versatile and can be planted in containers or directly into the ground. Their compact size, coupled with their prolonged blooming period, renders them perfect for pots or containers. If the region you live in doesn't experience winter frost, planting in the autumn will work just as well.
Remember, spot selection also matters. Violas prefer partial shade during the hottest part of the day. Too much exposure to full sun isn't ideal, but they do require a bit of sunlight. Therefore a sunny spot that gets a fair amount of shade would be perfect.
Understanding your hardiness zone and the grow season of violas in your area goes a long way in helping you grow and maintain their might, so don’t skip doing your homework on these!
Growing Violas from Seed
While violas are known to comfortably self-seed in garden spaces, planning to grow viola from seed indoors paves the way for more controlled and satisfying results. Despite the apparent complexity, the process is rather straightforward.
Start by selecting and preparing a warm location, ideally maintaining a temperature range of 18°C to 21°C. Fill small pots or cells with sterile potting mix, leaving a quarter inch off the top edge. Sprinkle two to three seeds per pot and remember, violas require darkness to germinate. So cover the seeds thoroughly with moistened potting mix.
Once the seeds sprout, shift them to a sunny spot or under plant lights. It's essential to maintain consistent moisture levels at this stage. The appearance of the first true leaves signifies it's time to thin the pots, retaining only the strongest looking seeding. As the seedlings grow and adjust to full-days outdoors, it's safe to transplant them permanently in the garden or outdoor pots.
Transplanting Viola Seedlings
Transplanting viola seedlings can be an exciting phase in the growth cycle of these vibrant, hardy plants. The time to transplant typically comes after the little seedlings have sprouted their first true leaves, normally indicating that they are now self-sufficient enough to be relocated.
When the seedlings are robust enough and possess the first true leaves, the weaker seedling in each container should be carefully weeded out. Make room for the strongest and healthiest looking seedling to continue growing and thriving. This selective elimination or "thinning" process ensures efficient use of nutrients and space for the most promising viola plants.
Once your violas are ready for transplant, carefully remove them from their current containers without causing any stress or damage to their delicate root system. If the season allows, prefab to do this job on a cool or cloudy day, as this will help reduce the shock and strain from the transition.
The chosen spot for your transplanted viola seedlings should ideally receive plenty of sunlight. However, it's noteworthy that violas also appreciate cool weather, which makes them particularly suited to grow seasons in the springtime or in regions with cooler hardiness zones.
Upon successful transplantation, be sure to water your viola plants well, and continue a regular watering pattern henceforth. Proper attention and care given at this stage can lay the groundwork for an abundance of beautiful violas flourishing in your garden. Remember, happy planting!
Caring for Your Violas

Caring for your violas is a rewarding task that requires a delicate balance of sunlight, water, plant food, and the right grow conditions. Whether you're a seasoned gardener or a beginner, understanding the needs of these vibrant plants is crucial to their growth and longevity. In this section, we'll delve into the specifics of viola care, from watering and feeding to pruning and overwintering. With the right care, your violas can thrive in any garden soil and cool climate, providing a burst of colour and charm to your outdoor space.
Watering and Feeding Your Violas
When it comes to caring for violas, a key factor to keep in mind is watering and feeding. Violas, like most garden plants, thrive when their water and nutrients are balanced.
Begin by gauging the moisture level of your garden soil. Violas can withstand dry spells but prefer a steady supply of water. However, too much water can lead to soggy soil conditions, which are not ideal for violas' roots.
The watering frequency for violas varies and significantly depends upon the climatic conditions. In a cool climate, you may need to water less frequently compared to a warmer region. Regardless, practice watering your violas when the top layer of the soil appears dry.
Feeding your violas is as crucial as their watering regime. Occasional doses of liquid feed or multipurpose compost can act as a catalyst to the growth condition of these beautiful plants. A nutrient-rich plant food can stimulate the flowering process and ensure prolonged blossoming.
Pruning and Deadheading Violas
Pruning and deadheading your violas isn't just a matter of appeal; it's key to encouraging these plants' growth and repeat flowering. So, let's delve into this vital aspect of viola care.
Step one is to remove any spent blooms. This process, known as deadheading, tricks the viola plant into thinking it hasn't yet completed its reproductive duty, encouraging it to produce more flowers.
Furthermore, this upkeep encourages viably healthy growth. Faded, damaged, or diseased portions of the plant can drain energy from the healthier parts, stymieing overall growth. Trimming these portions away enables the plant to channel energy productively.
Also, deadheading and regular pruning ward off disease and pest infestation, ensuring that your violas remain vibrant and charming, much to your gardener's delight.
A well-pruned viola isn't just healthier, it's also more aesthetically pleasing.
Overwintering Violas
In warmer climates, Violas show a superb level of resilience, often blooming throughout the winter. It's important to gauge the hardiness of your specific viola strain, as chilling tolerance varies across varieties. During this season, don't shy away from continuous feeding for your Violas, with a preference towards liquid feed that offer better absorption, especially when the ground is frosted.
What you should focus on, beyond anything else, is ensuring your violas receive ample sunlight while the soil around them avoids becoming overly saturated. In anticipation of an unusual cold snap, consider adding a couple of inches of straw or mulch over your violas to provide insulation for the roots.
Remember that caring for violas is not just about the feed you provide or the climate they're grown in. Your Violas’ overall health and vibrance is a direct reflection of the garden soil, sunlight, water, and plant food they're exposed to. By getting these grow conditions right in your own garden, you'll be amazed at the show these simple, yet exquisite flowers can put on for you throughout the winter season.
Overwintering violas involves much more than just plant care, it's about giving these plants the best possible chance to express their inherent beauty and strength. After all, gardening is as much an art as it is a science!
Common Problems and Diseases in Violas

Growing and caring for violas can be a rewarding experience for any master gardener. However, like any plant, violas are susceptible to a variety of diseases and pests. In this section, we will delve into the common problems that can plague your violas, from the dreaded viola leaf spot to the destructive viola black root rot. We'll also provide you with effective strategies to identify, treat, and prevent these issues, ensuring your violas remain healthy and vibrant. Whether you're growing viola from seed or have a garden ready plug plant in stock, this guide will be invaluable.
Identifying and Treating Viola Leaf Spot
Leaf spot represents a significant threat to the health of your violas. This fungal disease presents as brown or black spots on viola leaves, which, if left unchecked, will swiftly spread to adjacent plants. Its proliferation is often abetted by poorly ventilated environments.
Decisive action can curtail leaf spot's potentially devastating impact. Dealing with viola leaf spot effectively necessitates keen surveillance when selecting viola stock. Opt for plants presented in open, well-ventilated spaces to reduce the chances of infection.
Upon identifying violas with leaf spot symptoms, promptly exercise the option of pruning. Diligently shear the afflicted leaves with clean garden shears. This intervention drastically reduces the likelihood of spores transferring to healthy parts of the plant or neighbouring violas.
Despite these precautions, a persistent manifestation of leaf spot may warrant an escalation of your countermeasures. Turn your attention to fungicides as the next line of defence. A targeted treatment of the affected violas can bring the disease under control.
Throughout this process strive for effective watering practices. Ensure that your watering aims at the base of the plant to keep the leaves dry. This practice minimises the moist conditions that leaf spot favours, inhibiting its growth and reducing its destructive potential.
Dealing with Viola Black Root Rot
Viola plants are often susceptible to a malicious fungus known as black root rot. This fungal infection generally manifests as yellowing leaves on your viola and hampers the plant's growth, giving it a stunted appearance. In contrast to innocuous yellowing that might happen due to natural variables like light or water, a plant stricken by black root rot will lose its vitality due to the decaying root system.
This is not a malady you can easily overlook. The most potent sign of this disease is the poor growth and wilting, even when other conditions such as water and light are optimised. The fungi deteriorating the roots impede nutrient absorption, robbing your viola of its essential life support.
If you observe any violas showing these symptoms, the only way to halt this infectious disease is by immediate removal of the affected plants. This decisive action will prevent its spread to neighbouring violas, especially if your collection boasts a plug plant in stock.
To ensure the future health of your violas, it is necessary to address the root cause, literally. Adequate soil drainage is key in keeping away soil-borne fungi that target healthy roots. Shockingly, the simplest measure - a change in location - could be the most effective one.
Letting the soil lie fallow for some time gives it a chance to recover, reducing the fungi population. It would be best to choose a different spot for replanting your beloved violas, to break the lifecycle of the disease. With these actions, you can keep your garden free of the menace that is black root rot.
Other Common Viola Diseases and Pests
Fungal Leaf Spots and Rust: Poor watering techniques or cool, wet conditions may expose violas to these fungal infections. Avoid overhead irrigation and monitor weather changes.
Aster Yellows: This is a devastating viola disease which sadly, like viola black root rot, can't be salvaged once infected. A preventive measure would be to maintain a garden free from aster yellows-infected insects.
Rabbit Attacks: Rabbits have a sweet tooth for violas. A potential solution could be to surround your violas with rabbit-proof plants, like zonal geraniums.
Anthracnose: Besides causing viola leaf spot, this fungal disease can manifest as distorted or wilting plant parts. Regular care and vigilance can help in early detection and control.
Viola Cazorlensis, Viola banksii and others: Several species of violas can contract and spread diseases to each other, highlighting the importance of proper plant spacing and sanitation.
Growing Violas Indoors

Growing violas indoors can be a rewarding experience, offering a splash of colour and a touch of nature within your home. This section will guide you through the process, from the benefits of indoor violas to the care they require. Whether you're a seasoned gardener or a beginner, you'll find that violas are a versatile and resilient choice for indoor gardening.
They can bloom in late summer or throughout the winter, adapting to your preferences. Plus, they can thrive in a small pot or as a plug plant, making them a flexible option for any indoor space. Let's delve into the world of indoor violas and discover how to grow these charming plants successfully.
The Benefits of Indoor Violas
Introducing violas to your indoor environment can bring a multitude of benefits. Firstly, they make a stunning seasonal display with their vivid colours and delicate markings, offering a burst of nature in the confinement of your home.
Violas are also versatile, thriving in cool rooms with minimal direct sunlight. This makes them an ideal choice for individuals living in apartments or houses lacking expansive outdoor spaces.
Moreover, violas have adaptable blooming times to suit your preference. Whether you wish for their vibrant presence during the late summer or throughout the winter, these resilient plants can adjust to meet your needs.
Furthermore, growing violas indoors allows you to monitor and control their environment more closely. This leads to healthier plants and more consistent bloom times. Finally, their adaptability extends to their growing conditions, as both a small pot or a plug plant can serve as their home.
How to Care for Indoor Violas
Caring for indoor Violas requires a delicate approach. Step one involves placement. These petite flowers prefer cool rooms without direct sunlight. This mimics their outdoor ideal conditions. Hence, find a spot in your home that offers such an environment and place your small pot there. They can bloom throughout the winter, transforming any room into a lovely seasonal display.
Secondly, water management is key. Violas like their soil moist but not soaked. It's recommended to let the soil dry out slightly between waterings. However, keep an eye on the plant. If it begins to look wilted or droopy, it might be time for a drink.
Thirdly, deadheading is a key part of Viola care. This means the removal of spent flowers to encourage the plant to produce more blooms. So, get into the habit of regularly checking your violas and removing any fading or dead flowers.
Finally, ensure that your Violas get the right temperature. They enjoy the cool temperatures of a room that does not heat excessively. If you provide them with these conditions, your Violas will feel right at home, facilitating their blooming spree.
Buying and Propagating Violas

Whether you're a seasoned gardener or a beginner, the process of buying and propagating violas can be a rewarding experience. This section will guide you through the steps of acquiring these charming plants, either by purchasing ready plug plants or by propagating them yourself.
Violas are versatile and can be enjoyed throughout the year, making them a great addition to any garden. Whether you choose to plant them in a sunny spot, a seed tray, or a hanging basket, these plants are sure to bring colour and life to your space. Let's delve into the details of where to buy violas and how to propagate them.
Where to Buy Violas
When it comes to buying violas, you have a few options. The easiest way to start your viola collection is by purchasing ready plug plants. These are new plants that have been propagated and are ready to be transplanted into your garden. These can be bought online or at your local nursery.
Look for healthy viola plants with lots of buds and remember to consider the season. Nurseries typically start selling viola seedlings in the spring in cool climates and at the end of summer in warm areas.
Another option is to propagate violas yourself by seeding in a tray. This process can be done either in the spring or autumn, and while it can be a little more difficult, it presents a satisfying challenge for many gardeners.
Remember, regardless of how you acquire your violas, the location in which they are planted is crucial. Violas thrive in sunny spots, and trailing varieties are simply exquisite in hanging baskets.
You can enjoy these beautiful plants throughout the year, so it's best to plan ahead and buy your violas in accordance with their growing season.
Propagating Violas
Propagating violas can be accomplished in multiple ways, providing avid gardeners with the flexibility to choose the method best suited to their efforts. If you're looking to add more of these charming plants to your garden, consider collecting viola seeds and sowing them in a sunny spot in your garden.
Sow during spring or autumn, keeping in mind the seeds' need for warmth to germinate. Alternatively, perennial viola varieties can be divided during the autumn season. Careful extraction of established clumps and their subsequent transplantation into fresh compost will ensure a new batch of violas.
Another method is to propagate violas through cuttings. Although there is no guarantee that they will exactly match the parent plant in colour, it's well worth the effort. The best time for taking cuttings is in the spring when the violas are at their most vigorous stage of growth.
Remember, propagation is not just about increasing the number of plants but also about rejuvenating older ones. Apart from fresh plants, you will also be rewarded with several ready plug plants that you can hang in baskets throughout the year. It's one of the major benefits, expanding your floral collection while rejuvenating existing plantings.
Last but not least, plant vivacious violas and watch as they grace your garden with their colour and charm, a living testament to your green thumb and propagation prowess. Happy growing!
Final Thoughts on Growing and Caring for Violas

In conclusion, the viola plant is a versatile and vibrant addition to any garden. Its ability to thrive in both cool and warm climates, coupled with its long bloom time, makes it a favourite among gardeners. Whether you're a master gardener or a novice, the viola plant offers a rewarding gardening experience with its colourful blooms and hardy nature.
Remember, the key to a thriving viola plant lies in understanding its grow conditions - from the right amount of sunlight and water, to the perfect garden soil. Don't forget, violas are not just for outdoor gardens; they can also be grown indoors in small pots or hanging baskets, providing a splash of colour throughout the year. While we may not have covered every aspect of viola care in this guide, we hope it serves as a solid foundation for your viola gardening journey.
Happy planting!


